Making Cards with Odds and Ends
About a week ago, I mentioned going to the library and picking up some awesome stuff. One of the books I picked up was about card making, one of my fun, relaxing-type hobbies.

For this one, I used vellum paper to make the background more interesting. In the lower right corner of the card, you can see the light flower design on the paper. I cut the edges with a pair of crinkly scissors. Then I found the phrase and the clock - perfect for this card. (Actually, the phrase comes out of a card catalogue - as in, a catalogue you would buy cards from. So I made a card with an example of another card on it. Which is okay, because I'm not selling it.)
I attached the vellum paper with double-sided, permanent tape. Usually, that's my standard, but for the little bits on top, I broke out the 3D foam tape. It gives the pieces a little life, making them stick out more and giving the eye more to explore.
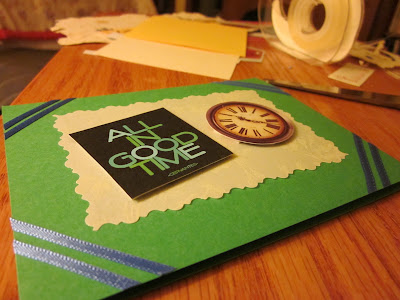
Next was the ribbon. I always test the outcome by laying pieces in place before attaching them to the card - a very important step. That step with the ribbon showed me that ribbon in each corner would not be visual overkill - you don't want the card to be too busy, even if all the individual parts are cool.
I also attached the ribbon with double-sided tape. I sliced each piece to the right width and attached it to the ribbon, which I then laid on the card at a careful angle. This is a step for which I probably could have used glue, but I didn't want the excess glue to stain the card or ribbon. Glue also has the potential for leaving funny bumps under stuff, so I went the more meticulous route instead.
Then comes the inside. I always try to tie the outside and inside together with some sort of theme. In this case, everything ties together a little: the ribbon, the crinkle-cut paper, and even the writing mimicks the writing on the cover. (You can use a printer to make your writing more uniform, but I like the hand-written version better.)
 Last is the back. I have my symbol and "company name" on the back of every card. It makes them uniquely mine, and friends will remember that I made them even if, for some weird reason, I don't sign my name inside. The symbol is a stamp - the red bit doesn't tie in with the card at all, but with the name "red wheelbarrow," I figure it's okay.

It has some good ideas in it - things that I could brainstorm, if I had the time for them, but why do that when someone else has already done the work? Seeing those cool ideas made me want to create cards again. (That was the whole reason I brought the book home.)
So, earlier this week, I picked an idea and went with it. I decided to use ribbon on a card somehow. I have quite the stash of scraps and paper-craft tools, so everything I need is right at my fingertips.
For starters, I cut a piece of cardstock in half the short way and fold it in half, creating a 4"x5.5" base to work with. Why? Because that's the size of the envelopes I have, and that's where I draw the line. Let someone else worry about making the envelopes, and I'll make the pretties to go inside. One item a friend got me that really helps for this is a straight-edge paper cutter.
I pick some kind of theme for the card - this one was a belated birthday card. Next, I dig through my scraps to create some kind of nifty collage on the cover, with or without writing.

For this one, I used vellum paper to make the background more interesting. In the lower right corner of the card, you can see the light flower design on the paper. I cut the edges with a pair of crinkly scissors. Then I found the phrase and the clock - perfect for this card. (Actually, the phrase comes out of a card catalogue - as in, a catalogue you would buy cards from. So I made a card with an example of another card on it. Which is okay, because I'm not selling it.)
I attached the vellum paper with double-sided, permanent tape. Usually, that's my standard, but for the little bits on top, I broke out the 3D foam tape. It gives the pieces a little life, making them stick out more and giving the eye more to explore.

Next was the ribbon. I always test the outcome by laying pieces in place before attaching them to the card - a very important step. That step with the ribbon showed me that ribbon in each corner would not be visual overkill - you don't want the card to be too busy, even if all the individual parts are cool.
I also attached the ribbon with double-sided tape. I sliced each piece to the right width and attached it to the ribbon, which I then laid on the card at a careful angle. This is a step for which I probably could have used glue, but I didn't want the excess glue to stain the card or ribbon. Glue also has the potential for leaving funny bumps under stuff, so I went the more meticulous route instead.

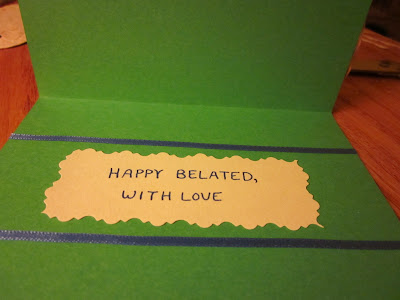
Then comes the inside. I always try to tie the outside and inside together with some sort of theme. In this case, everything ties together a little: the ribbon, the crinkle-cut paper, and even the writing mimicks the writing on the cover. (You can use a printer to make your writing more uniform, but I like the hand-written version better.)
Little differences that make it pop: the hand writing, the different angle of the ribbons, and the cream cardstock instead of vellum. I was actually out of the vellum, but the recipient doesn't need to know that, and won't guess it because it all ties together.
Last is the back. I have my symbol and "company name" on the back of every card. It makes them uniquely mine, and friends will remember that I made them even if, for some weird reason, I don't sign my name inside. The symbol is a stamp - the red bit doesn't tie in with the card at all, but with the name "red wheelbarrow," I figure it's okay.


Comments
Post a Comment