How to Make a Get Well/Birthday/Fun Card
Remember that cute card I made? Here's the tutorial for how to make one of your own!
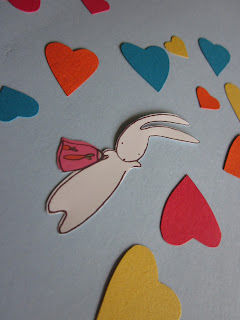
First, cut out a bunch of cardstock hearts and some kind of little critter. You can use a straight edge or a pair of scissors. For the hearts, I cut out three different sizes, then traced them to make multiples. I also made some really small ones with a heart-shaped hole punch. This cute bunny is from a poster for the book Moon Rabbit - a cute story of two lonely bunnies not being so lonely anymore.

Find a spare envelope in the mess that is your stash of goodies. Take a large piece of cardstock, fold it in half, then cut it to size so that it will fit in the envelope. (I love my paper cutter for these projects!) Be sure to put the card in the envelope so that you know it will fit. There's nothing worse than getting to the end and having to make an envelope from scratch after you thought you were done.

Cut a thin strip of green cardstock to size for the bottom of the card. Use a pair of fancy, crimpy scissors for the edging on the grass. Attach it with double-sided tape. (Another favorite item for making cards!)

Lay out all your hearts and the little critter on the card. This is the step where you rearrange things over and over till you're satisfied with the placement, so move things around a lot. Keep in mind - those bigger hearts will have thread attached to them. Little things like a heart's angle or the arrangement of the colors can make a big difference.


Next, glue on the smaller hearts. The glue I used is a clear craft glue, which dries without marking the paper.

Now, attach the bigger hearts. For this step, you will need double-sided craft foam, as pictured above. This gives the heart balloons an extra dimension on the page. Cut small pieces to size and affix them to the back of the hearts, one at a time.

I used silver embroidery floss as the balloon strings - depending on your colors and theme for the card, almost any color can work. Lay one thread on the sticky foam, and then you're ready to attach it to the card in the desired place.

After attaching two of these, I decided I wanted fewer, bigger hearts, to eliminate the clutter from the strings. Because I hadn't attached the medium-sized hearts, that was an easy fix.

After you've affixed all the balloons with their strings, it's time to glue the thread in place. For this part, I used good old Elmer's glue because it's stronger than the craft glue. I put down a pea-sized drop where I wanted the strings to meet, then kind of rolled them in it. Then the threads were all coated with glue in that spot. (Use the size of your critter to decide where you want the threads to meet - it should be floating above the grass.) Next, trim the strings to the desired length. Put some glue on each end, then press it to the paper.
Keep in mind, the Elmer's will show on this paper, at least a little, so keep it minimal - you can always add more. In the above picture, the glue is still drying.

Use your double-sided tape to attach your little critter, so it looks like it's floating away with the balloons. Again, cut the tape to the desired size so that it doesn't show from the front - not only will it look messy, it will attach to the envelope, and something will end up ripping.

For the inside of the card, I cut a contrasting rectangle and used the same crimpy scissors as for the grass. Practice writing the phrase on scratch paper first, so that you know how you want it to look. Once you've written it on the rectangle, add a little heart. Leave space at the bottom so you can sign it. The whole piece is also attached to the card with double-sided tape.

I included my signature design on the back, as I always do. This is completely optional, but I think it's fun to have your own "company" label.
Above all, have fun with a project like this! Make it your own.


Comments
Post a Comment